First, let me say that this pattern is one of the best corset pattern available today. I love this pattern and can fit any size and shape with relative ease. However, is does have a few quirks and can require a few tweaks to get the most benefit out of it.
The following suggestions are little tricks and quips about my experiences with this pattern. I am listing them here to give beginners a guiding hand.
A. Which to choose, the Dore style or the Silverado?
These two styles are both used from 1860 until 1898, so you want to pick the style that is most appropriate to your body type. Basically, the Dore style with the straight seam construction will tend to de-accentuate a full bustline. The Silverado will tend to emphasize the bust line. In my experience, smaller busted figures will greatly improve their figure with the Silverado style. Larger busted figures will generally have a more pleasing appearance with the Dore style. My general rule of thumb: A-cup, B-cup, and C-cup figures should wear the Silverado, while D-cup and larger figures should wear the Dore. The D-cup figure in the Silverado will have the bust line lifted and presented in an un-glamorous position below the chin, which is not the proper look for the Victorian Era.
Another consideration for which corset to style to choose would be your level of sewing skills. The Dore style is much easier to put together, while the Silverado requires a little more effort. A person making a corset for the first time, who does not have access to assistance, may wish to try the Dore first in order to get a feel for what corset making entails. Corset are not difficult to make, but they are intimidating, and require precision sewing.
B. How do I choose which size I need?
This is the hardest part about making a corset, finding the proper size. Once again, for this corset, I have a few basic rules:
1. You need to pick a cup size.
For this pattern, the cup sizes run somewhat large. The choice of cup size may be altered by the next step, but this will give you a place to start.
If you are a very small A-cup, you should choose the A cup pattern.
If you are a moderate A-cup, B-cup, or small C-cup size, you should cut the B cup pattern.
If you are a larger C-cup or D-cup, you should choose the C cup pattern.
If you are a DD-cup or DDD-cup, you should choose the D-cup pattern.
I have not yet found a person who needed a larger than D-cup pattern. And I have fit many large figures. You will have to possess an extreme figure to require the DD and DDD cup patterns.
2. Looking at the size chart.
The size chart as given on the envelope is basically for the B cup size patterns only. If in step A above, you chose a different cup size, you will need to make adjustments to the measurements on the charts. The reason for this is that the A cup pattern will remove 2″ of fabric from the standard B cup size. The C cup pattern will add 2″ of fabric to the standard size. The D cup pattern will add 4″ to the standard size. These changes are not reflected on the single size chart provided in this pattern.
Below, I have created the separate size charts needed for each cup size.
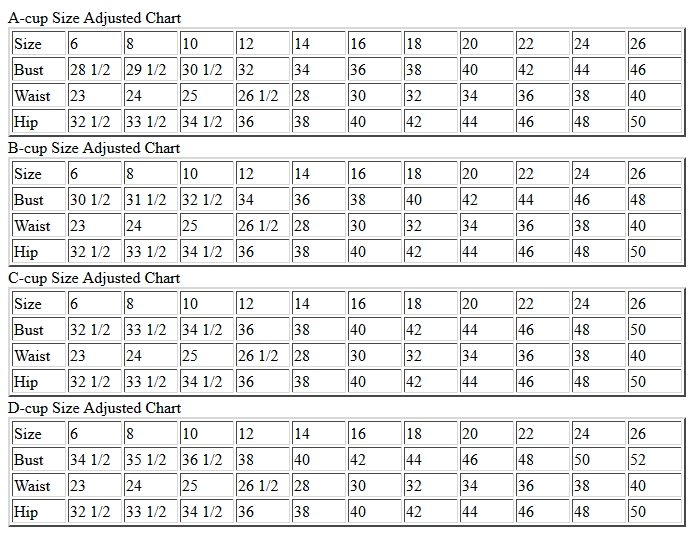
3. Finding your size on the size chart.
Now it is time to compare your personal body measurements, non-corseted, to the charts to select a size. Looking at the size chart for your cup size, follow the general rules below:
* You want to select an individual size for each part of your body to achieve a good fit. The corset should conform to your body, not conform your body to a corset. You may be a size 18 bust, a size 16 waist and a size 20 hip. That is fine. You should trace your pattern out on a new piece of paper, fading in and out to the various size lines as needed.
If you need to enlarge the hip area to a bigger size, change only the seams at the side and back of the corset. Do Not enlarge the front seams below the waist, as this will cause the tummy part of the corset to swell outwards.
* This pattern generally runs large. This is caused by stretch of the fabric, and compaction of the body by the corset. As result, if you need a size 14 or larger, reduce the pattern by one size automatically. For example, If you you match the size 18 on the chart, cut out a size 16 instead. Very large sizes may need to reduce the pattern by 2 sizes.
* If at any time, your chosen waist size is larger than your chosen bust size, reduce the cup size to the next smaller size and start the selection process over. A D-cup figure combined with a large waist will require a smaller pattern cup size.
- If you want to be able to tight lace and reduce your waistline, be sure that the hip area is large enough to allow for the change. When tight lacing, the waist is compacted, which will relocate the body both up into the chest area, and down into the hip area. If the top and bottom of your corset do not allow for this expansion, you will not be able to pull in the waist.
* The top of the corset should come up to mid-nipple level. If you corset is too short, lengthen the pattern by cutting and spreading the pattern where marked to the needed length. If the corset come up too high, I like to shorten the pattern by simply cutting the top to the desired height. The reason is I find that the point at which the corset begins to expand for the bust is somewhat low. If you cut and shorten the pattern in the middle, this will drop the bust area to near the waist.
* The bottom of the corset should end high enough so that it does not dig into your legs or pelvis when you sit down. Shorten the corset by cutting it off at the hem as needed for a good fit.
C. Other general fitting notes.
* The corset should have a 2″-3″ gap at the center back when laced. If you have too small of a gap, you should make the corset one size smaller next time. If you have over 4″ gap, you should make the corset bigger next time.
* When laced, the center back edges of the corset should be fairly straight, top to bottom. If you have wide differences in the gap, the corset will tend to pinch and be very uncomfortable. For example, If you have a 3″ gap at the top, 1″ gap at the waist, and 5″ gap at the bottom, you will be miserable. In this case the waist needs to be made a smaller size and the hips a larger size, to achieve an even 3″ gap top to bottom.
* The more bones that are in your corset, the more comfortable the corset will be to wear. The bones should be placed at every seam, and between the seams as needed to make the distance between the bones to less than 3″. Larger figures may require more bones than smaller figures.
* Spiral steel boning should be used in the front of the Silverado corset, to curve around the cup gores. You can use the spiral boning everywhere else as well, EXCEPT at the center back on either side of the grommets, which must be spring steel.
* Use only 1/4″ wide steel boning. Anything less will not hold properly. Using wider boning will not add support but will be uncomfortable. The largest figures will have full support with the 1/4″ wide bones.
* I personally like to use the 00 size of grommets. These are smaller than the normal size, which allows the fabric to be stretched, rather than cut, to make a hole. This will give a stronger grip on the grommet.